
Air pressure tanks play a crucial role in various applications, from providing water pressure in residential systems to aiding industrial processes. Installing an air pressure tank may seem like a daunting task, but with a systematic approach, it can be accomplished efficiently. In this step-by-step guide, we will walk you through setting up an air pressure tank to ensure optimal performance and safety.
Step 1: Gather Necessary Tools and Materials
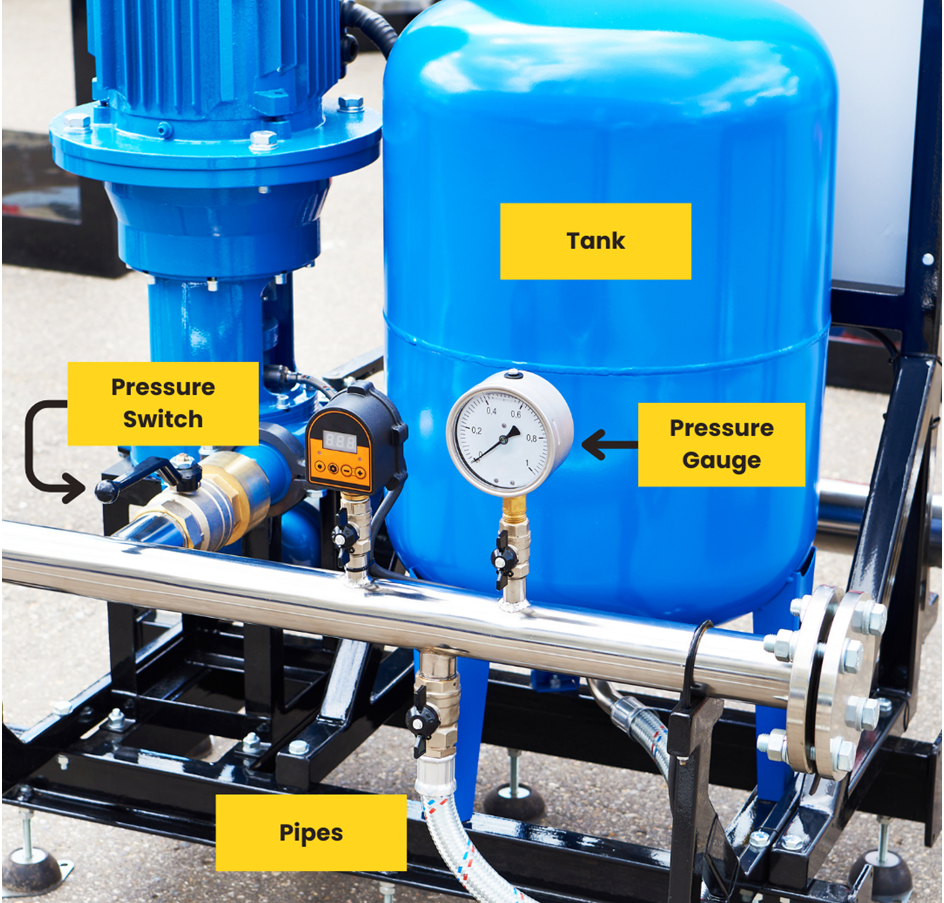
You will need a wrench, Teflon tape, a pressure gauge, a pressure switch, and, of course, the air pressure tank. Ensure that all components are of the appropriate size and compatible with your system.
Step 2: Choose the Right Location
Select a suitable location for the air pressure tank. It should be placed on a stable and level surface, away from direct sunlight and extreme temperatures. Adequate ventilation is essential to prevent overheating, so avoid confined spaces.
Step 3: Turn Off the Power and Water Supply
Before starting the installation, switch off the power to the system and shut off the water supply. It will prevent any accidents or damage during the setup process.
Step 4: Install the Pressure Switch
Connect the pressure switch to the tank using a wrench. Ensure it is securely tightened. The pressure switch regulates the tank’s operation, turning the pump on and off at specified pressure levels.
Step 5: Attach the Pressure Gauge
Using Teflon tape to create a secure seal, attach the pressure gauge to the designated port on the air pressure tank. The gauge allows you to monitor the tank’s pressure, ensuring it stays within the desired range.
Step 6: Connect Pipes
Carefully connect the pipes to the inlet and outlet ports on the air pressure tank. Use the appropriate fittings and make sure they are tightened securely with a wrench. Properly sealed connections are crucial to avoid leaks.
Step 7: Set the Tank Pressure
Adjust the air pressure inside the tank to the recommended level using a tire pressure gauge. This step ensures that the tank operates optimally and maintains consistent pressure in the system.
Step 8: Turn the Power On, Including the Water Supply
Once all connections are secure, turn the power back on and restore the water supply. Verify that there are no leaks and that the system is functioning correctly.
Step 9: Test the System
Run a test to ensure the air pressure tank is working as expected. Monitor the pressure gauge and listen for any unusual noises. If you cannot hear any sounds, proceed to the next step.
Step 10: Adjust Pressure Switch Settings
Fine-tune the pressure switch settings to align with your system’s requirements. Follow the manufacturer’s guidelines to set the cut-in and cut-out pressures for optimal performance.
Step 11: Inspect Regularly
Regular maintenance is key to the longevity of your air pressure tank. Inspect the system periodically for leaks, unusual noises, or any signs of wear. Address any issues promptly to avoid potential damage.
Step 12: Seek Professional Assistance if Needed
While this guide provides comprehensive instructions, it’s essential to recognise when professional help may be required. If you encounter challenges or are unsure about any aspect of the installation process, consider informing the reputable pressure tank provider in Singapore. Their expertise can save you time and resources, ensuring a seamless and trouble-free setup.
In Conclusion
Installing an air pressure tank requires careful planning and execution. By following these step-by-step instructions, you can set up your pressure tank with confidence. However, don’t hesitate to seek assistance from a reliable provider in Singapore if you need additional support. Their knowledge and experience can make the installation process more efficient, allowing you to enjoy the benefits of your air pressure tank without unnecessary hassles.
Need to buy an air pressure tank? Contact Unicontrols today! They might help you to install this properly.